Warning: preg_match(): Compilation failed: unrecognized character follows \ at offset 1 in /home/r5652521/public_html/soma-engineering.com/wp-content/themes/affinger/functions.php on line 1548
Warning: preg_match(): Compilation failed: unrecognized character follows \ at offset 1 in /home/r5652521/public_html/soma-engineering.com/wp-content/themes/affinger/functions.php on line 1548
Warning: preg_match(): Compilation failed: unrecognized character follows \ at offset 1 in /home/r5652521/public_html/soma-engineering.com/wp-content/themes/affinger/functions.php on line 1548
Warning: preg_match(): Compilation failed: unrecognized character follows \ at offset 1 in /home/r5652521/public_html/soma-engineering.com/wp-content/themes/affinger/functions.php on line 1548
Warning: preg_match(): Compilation failed: unrecognized character follows \ at offset 1 in /home/r5652521/public_html/soma-engineering.com/wp-content/themes/affinger/functions.php on line 1548
Warning: preg_match(): Compilation failed: unrecognized character follows \ at offset 1 in /home/r5652521/public_html/soma-engineering.com/wp-content/themes/affinger/functions.php on line 1548
Warning: preg_match(): Compilation failed: unrecognized character follows \ at offset 1 in /home/r5652521/public_html/soma-engineering.com/wp-content/themes/affinger/functions.php on line 1548
Warning: preg_match(): Compilation failed: unrecognized character follows \ at offset 1 in /home/r5652521/public_html/soma-engineering.com/wp-content/themes/affinger/functions.php on line 1548
この記事は、Laravel 入門者向けの ひとこと掲示板シリーズの記事になります。
Laravel で ひとこと掲示板の Web アプリを作ってみましょうという事で、前回の続きの続きになります。
Cloud 9 で Laravel の環境を作っていない方は、以下を参考に環境を準備してくださいね。
今回は、データベースを作り、テーブルを作って、実際にデータを入れてみます。
正直、Laravel の save メソッドには驚きました。データが無ければ新規で登録しますし、あれば更新するんですね。
SQL の Insert や Set を意識せずに使えるとは、凄いと思いました。
以降、コマンドでの入力が多いのですが、本環境では Cloud 9 を使っているので、Cloud 9 のコンソールから入力します。
以下の画像が参考になります。
では早速はじめましょう。
MySQL をインストールする
Cloud 9 でコマンドを入力し、MySQL をインストールします。(Apache が動作中であればControl 押しながら C を押して一旦止めます。)
|
1 2 3 4 5 6 |
user:~/workspace/bbs $ sudo mysql-ctl start * Starting MySQL database server mysqld ...done. * Checking for tables which need an upgrade, are corrupt or were not closed cleanly. |
phpMyAdmin をインストールする
Cloud 9 でコマンドを入力し、phpMyAdmin をインストールします。
|
1 2 3 4 5 6 7 8 9 10 11 12 13 14 |
user:~/workspace/bbs $ phpmyadmin-ctl install Starting installation Starting MySQL * Starting MySQL database server mysqld ...done. Configuring database Starting apache * Restarting web server apache2 ...done. PHPMyAdmin Installation complete. You can log in at: https://.../phpmyadmin with the following username (and blank password): Username: user |
データベースを作る
phpMyAdmin にログインして、データベースを作ります。
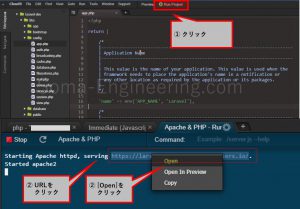
1. まず、コンソールで以下のように Apache を起動し、URL をクリックして開きます。
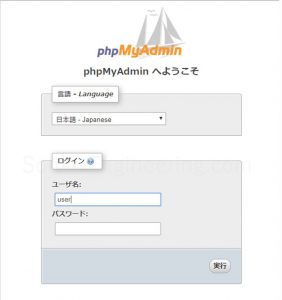
2. URL の後に /phpmyadmin/と入力して Enter を押します。(例:https://sampleapp-user.c9users.io/phpmyadmin/)
phpMyAdmin のインストール後に発行されたユーザー名でログインします。デフォルトでパスワードは空です。
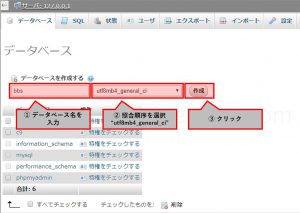
3. 以下の手順で、データベースを作成します。照合順序の選択に気をつけてください。
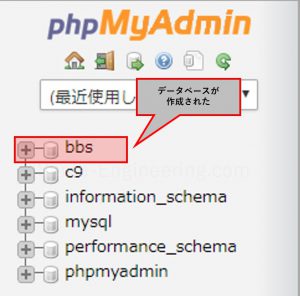
4. データベースが作成されました。
カラムの文字列制限の設定
テーブルのカラムの文字数制限の設定をします。
これをしないと、migration の際にエラーがでてしまいます。
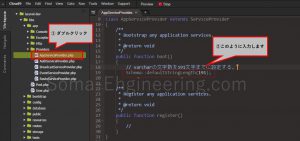
以下のように、app -> Providers 内の AppServiceProvier.php を開いて、設定を入力します。
- use Illuminate\Support\Facades\Schema; を追加
- Schema::defaultStringLength(191); を追加
|
1 2 3 4 5 6 7 8 9 10 11 |
use Illuminate\Support\Facades\Schema; class AppServiceProvider extends ServiceProvider { public function boot() { Schema::defaultStringLength(191); } } |
テーブルを作る
テーブルの作成
Cloud 9 のコンソールでコマンドを入力し、テーブルを作ります。
|
1 2 3 4 |
user:~/workspace/bbs $ php artisan make:model Post --migration Model created successfully. Created Migration: 2018_06_13_210610_create_posts_table |
テーブルのカラムの設定をする
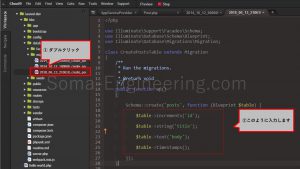
以下のように、テーブルのカラム毎に設定をします。
① create メソッドは第一引数で指定した名前のテーブル'posts' を作ります。
第二引数に関数(無名関数)を使う。$table が作られた後に完了して呼び出されるようなイメージです。
② incrementsメソッドで、主キーをAuto Increment で発行します。
③ stringメソッドで title のカラムを作ります。( varchar を指定)
④ textメソッドで body のカラムを作ります。
⑤ timestamps メソッドで created_date, updated_date のカラムを作ります。
|
1 2 3 4 5 |
Schema::create('posts', function (Blueprint $table) { $table->increments('id'); $table->string('title'); $table->text('body'); $table->timestamps(); |
環境設定をする
bbs ディレクトリ直下にある環境設定の値が入っている .env ファイルを編集します。DB_DATABASE は mysql になります。
|
1 2 3 |
DB_DATABASE=mysql DB_USERNAME=user DB_PASSWORD= |
テーブルのカラム作成
マイグレーションをします。まだ意味がよく理解できていないので、引用しました。
マイグレーションとはデータベースのバージョンコントロールのような機能です。
アプリケーションデータベースのスキーマの更新をチームで簡単に共有できるようにしてくれます。
ここで使っているマイグレーションは、実際にはテーブルを作成しています。
Cloud 9 のコンソールでコマンドを入力します。
|
1 2 3 4 5 6 7 8 |
user:~/workspace/bbs $ php artisan migrate Migrating: 2014_10_12_000000_create_users_table Migrated: 2014_10_12_000000_create_users_table Migrating: 2014_10_12_100000_create_password_resets_table Migrated: 2014_10_12_100000_create_password_resets_table Migrating: 2018_06_13_210610_create_posts_table Migrated: 2018_06_13_210610_create_posts_table |
テーブルにデータを入れてみる
ここまでの過程で、既にテーブルは作成されましたので、試しにデータを入れてみます。
以下のような流れで進めます。
① php artisan tinker で、Laravelでプログラムを対話的に使うようにします。
② 名前空間である App の クラスの Post を New してインスタンスを作成します。
③ title(タイトル)と body(本文)を $post の title に代入します。
④ save メソッドでデータを入れます。(これを実行してはじめてテーブルに書き込まれます。)
|
1 2 3 4 5 6 7 8 9 10 11 12 13 |
user:~/workspace/bbs $ php artisan tinker Psy Shell v0.9.6 (PHP 7.0.30-1+ubuntu14.04.1+deb.sury.org+1 — cli) by Justin Hileman >>> $post = new App\Post(); => App\Post {#2832} >>> $post->title = 'Title1'; => "Title1" >>> $post->body = 'Body1'; => "Body1" >>> $post->save(); => true |
|
1 |
ちなみに save メソッドでデータを書き込みましたが、内部的な処理が見えないので var_dump して見てみました。 |
|
1 2 3 4 5 6 7 8 9 10 11 12 13 14 15 16 17 18 19 20 21 22 23 24 25 26 27 28 29 30 31 32 33 34 35 36 37 38 39 40 41 42 43 44 45 46 47 48 49 50 51 52 53 54 55 56 57 58 59 60 61 62 63 64 65 66 67 68 69 70 71 72 73 74 75 76 77 78 79 80 81 82 83 84 85 86 87 88 89 90 91 92 93 94 |
>>> var_dump($post); object(App\Post)#2832 (26) { ["connection":protected]=> string(5) "mysql" ["table":protected]=> NULL ["primaryKey":protected]=> string(2) "id" ["keyType":protected]=> string(3) "int" ["incrementing"]=> bool(true) ["with":protected]=> array(0) { } ["withCount":protected]=> array(0) { } ["perPage":protected]=> int(15) ["exists"]=> bool(true) ["wasRecentlyCreated"]=> bool(true) ["attributes":protected]=> array(5) { ["title"]=> string(6) "Title1" ["body"]=> string(5) "Body1" ["updated_at"]=> string(19) "2018-06-13 21:42:39" ["created_at"]=> string(19) "2018-06-13 21:42:39" ["id"]=> int(1) } ["original":protected]=> array(5) { ["title"]=> string(6) "Title1" ["body"]=> string(5) "Body1" ["updated_at"]=> string(19) "2018-06-13 21:42:39" ["created_at"]=> string(19) "2018-06-13 21:42:39" ["id"]=> int(1) } ["changes":protected]=> array(0) { } ["casts":protected]=> array(0) { } ["dates":protected]=> array(0) { } ["dateFormat":protected]=> NULL ["appends":protected]=> array(0) { } ["dispatchesEvents":protected]=> array(0) { } ["observables":protected]=> array(0) { } ["relations":protected]=> array(0) { } ["touches":protected]=> array(0) { } ["timestamps"]=> bool(true) ["hidden":protected]=> array(0) { } ["visible":protected]=> array(0) { } ["fillable":protected]=> array(0) { } ["guarded":protected]=> array(1) { [0]=> string(1) "*" } } => null |
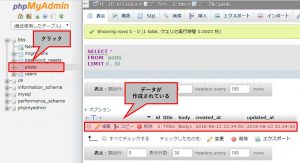
phpMyAdmin を見ると、データが作成されている事が分かります。
テーブルにデータを更新してみる
データが作成されましたが、更に title だけデータを入れたらどうなるのでしょうか。
私の想定では、id が 1 増えて、新規にデータが増えるのかと思いましたが、そうでは無いのです。
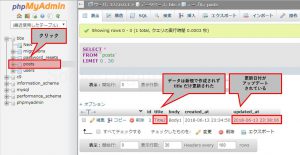
指定したカラムのデータだけが更新される事が分かりました。
既にデータがある場合は、新規で作らずに更新するという事を Model のほうで処理しているようです。
|
1 2 3 4 5 6 7 |
>>> $post->title = 'Title2'; => "Title2" >>> $post->save; => null >>> $post->save(); => true |
title と updated_at だけが更新されているのが分かります。
いかがでしょうか。これで、データベースにテーブルを作成し、実際にデータを入れる事ができました。
では最後までお読みいただきありがとうございました!
以下の記事をクリックして次に進みましょう!
おすすめの本はこちら ↓↓↓
