Warning: preg_match(): Compilation failed: unrecognized character follows \ at offset 1 in /home/r5652521/public_html/soma-engineering.com/wp-content/themes/affinger/functions.php on line 1548
Warning: preg_match(): Compilation failed: unrecognized character follows \ at offset 1 in /home/r5652521/public_html/soma-engineering.com/wp-content/themes/affinger/functions.php on line 1548
Warning: preg_match(): Compilation failed: unrecognized character follows \ at offset 1 in /home/r5652521/public_html/soma-engineering.com/wp-content/themes/affinger/functions.php on line 1548
Warning: preg_match(): Compilation failed: unrecognized character follows \ at offset 1 in /home/r5652521/public_html/soma-engineering.com/wp-content/themes/affinger/functions.php on line 1548
Warning: preg_match(): Compilation failed: unrecognized character follows \ at offset 1 in /home/r5652521/public_html/soma-engineering.com/wp-content/themes/affinger/functions.php on line 1548
Warning: preg_match(): Compilation failed: unrecognized character follows \ at offset 1 in /home/r5652521/public_html/soma-engineering.com/wp-content/themes/affinger/functions.php on line 1548
こんにちは!SE ブログの相馬です。
今回は、コマンドで CPU とメモリの負荷状態を確認する方法について調べてみました。
PC の負荷状態をデータとして取得したい場合はコマンドがおすすめ
PC の負荷状態を確認する一番簡単な手段としては、タスクマネージャーから確認するのが一般的かと思われます。タスクマネージャーからは CPU をはじめ、メモリやディスクやネットワークの使用率を一覧で見る事ができるのでとても見やすく便利です。
ただしトラブルシューティングなどで、これらの負荷状態をデータとして取得したい場合はタスクマネージャーではできませんので、コマンドやツールを使ってデータを取得する必要があります。
サーバーの場合は、監視ツールが大体そのサーバーのCPU やメモリなどのリソース監視しているので、わざわざ手動でデータを取得する必要は無いのですが、PC の場合は監視対象として設定している環境は余り無いと思いますので、データを手動で取得する必要があるわけです。
ここではコマンドを使って CPU とメモリの使用率をデータで取得してみました。例えば PC のトラブルシューティングで問題を再現させる際にデータを取得しておくと、原因の特定に役立つ場合があるかと思います。
CPU の負荷状態
コマンドプロンプトを起動し、以下のコマンドをコピーして貼り付けて実行してみましょう。CPU の使用率が 1 秒間毎に表示されます。
|
1 |
typeperf "\processor(_total)\% processor time" |

CPU の負荷状態を CSV としてファイルを保存したい場合は、以下のコマンドで保存する事ができます。ここでは、10 回 (10 秒) のデータを取得して出力しています。
|
1 |
typeperf -sc 10 -si 1 -o c:\temp\log.csv -y "\processor(_Total)\% Processor Time" |

メモリの負荷状態
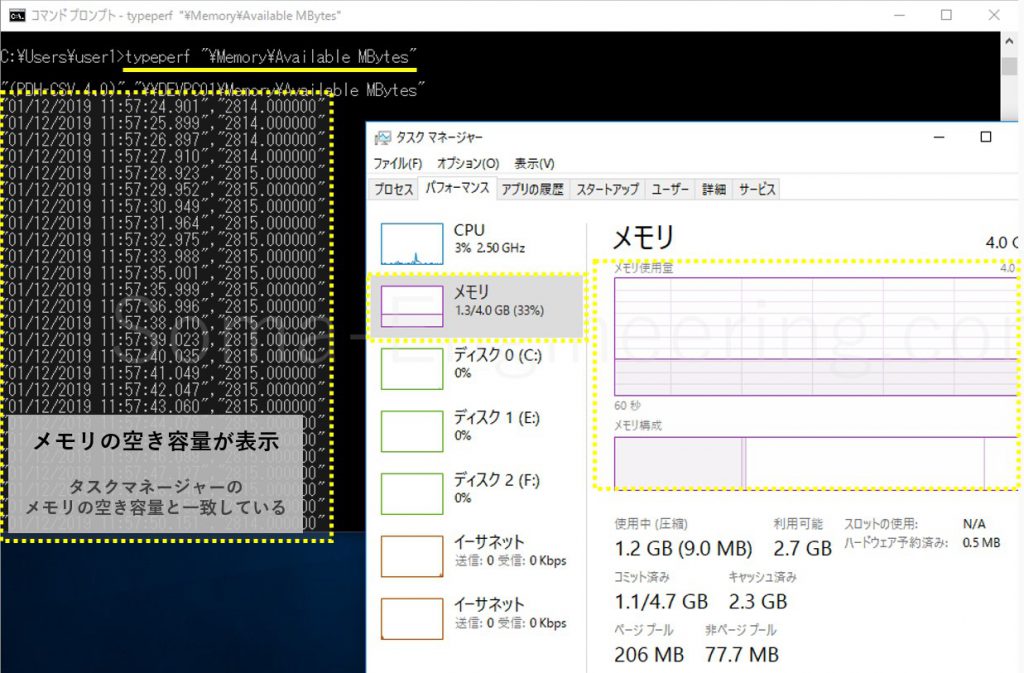
コマンドプロンプトを起動し、以下のコマンドをコピーして貼り付けて実行してみましょう。メモリの空き容量が 1 秒間毎に表示されます。
|
1 |
typeperf "\Memory\Available MBytes" |

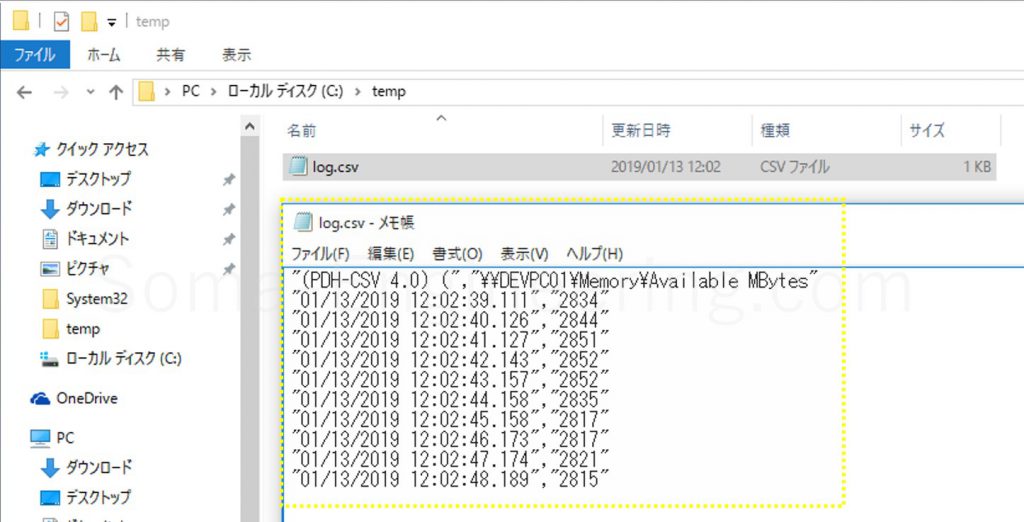
メモリの空き容量を CSV としてファイルを保存したい場合は、以下のコマンドで保存する事ができます。ここでは、10 回 (10 秒) のデータを取得して出力しています。
|
1 |
typeperf -sc 10 -si 1 -o c:\temp\log.csv -y "\Memory\Available MBytes" |

特定のプロセスの負荷状態
特定のプロセスの CPU とメモリの使用量を確認したい場合は、PowerShell から実行する事ができます。ここでは、Windows Search のサービスのプロセスがどのくらい消費しているのか確認してみました。
|
1 2 3 4 5 6 7 8 9 10 11 12 13 14 15 16 |
$properties=@( @{Name="Process Name"; Expression = {$_.name}}, @{Name="CPU (%)"; Expression = {$_.PercentProcessorTime}}, @{Name="Memory (MB)"; Expression = {[Math]::Round(($_.workingSetPrivate / 1mb),2)}} ) $name='SearchIndexer' Get-WmiObject -class Win32_PerfFormattedData_PerfProc_Process -filter "Name='$name'" | Select-Object $properties | Format-Table -AutoSize 実行結果 Process Name CPU (%) Memory (MB) ------------ ------- ----------- SearchIndexer 0 16.23 |
まとめ
いかがでしょうか。
一旦、CPU の使用量やメモリの空き容量をデータとして取得するツールを作ればトラブルシューティングの際に実行し、後の原因追及の参考情報として使用する事ができますので便利だと思います。
それでは最後までお読みいただきありがとうございました!


