Warning: preg_match(): Compilation failed: unrecognized character follows \ at offset 1 in /home/r5652521/public_html/soma-engineering.com/wp-content/themes/affinger/functions.php on line 1548
Warning: preg_match(): Compilation failed: unrecognized character follows \ at offset 1 in /home/r5652521/public_html/soma-engineering.com/wp-content/themes/affinger/functions.php on line 1548
Warning: preg_match(): Compilation failed: unrecognized character follows \ at offset 1 in /home/r5652521/public_html/soma-engineering.com/wp-content/themes/affinger/functions.php on line 1548
Warning: preg_match(): Compilation failed: unrecognized character follows \ at offset 1 in /home/r5652521/public_html/soma-engineering.com/wp-content/themes/affinger/functions.php on line 1548
Warning: preg_match(): Compilation failed: unrecognized character follows \ at offset 1 in /home/r5652521/public_html/soma-engineering.com/wp-content/themes/affinger/functions.php on line 1548
こんにちは!そーまんです。
今回は、Active Directory でオブジェクトをまとめて取得する方法やファイルにエクスポートする方法について書いてみました。
PowerShell で AD オブジェクトを取得すると楽できる
Active Directory を担当されている方であれば分かると思いますが、社内のコンピューターアカウントや、ユーザーアカウントの一覧を出してほしいとか依頼があったりします。
数が少なければ良いのですが、さすがに画面を見て Excel などに一個一個手入力する事は、アカウントの数が多いと時間がかかってしまいますよね。入力ミスの可能性もありますし非効率です。
ユーザー名やコンピューター名のみであれば、Active Directory ユーザーとコンピューターのスナップインからエクスポートできます。
しかし、Active Directory のオブジェクト、例えばコンピューターアカウントであれば Windows のバージョンや、ユーザーアカウントであればパスワードの有効期限日などを取り出したい時があるかと思います。
そういった情報を必要な分だけ取得して一覧表示したい場合や、またファイルにエクスポートしたい場合、 Active Directory ユーザーとコンピューターのスナップインからはできませんが、PowerShell にはそういった事が可能です。
ここでは PowerShell を使って AD のコンピューターやユーザーアカウントのオブジェクトから情報を抜き出して一覧表示したりエクスポートする方法について説明しています。皆様のお役に立てれば幸いです。
個人的な観点ですが、視認性を向上する為にコマンドレットの内容が長いものは、シングルクォーテーションで区切って複数行にして書いています。
Get-ADComputerでコンピューターアカウントを取得する
Get-ADComputer コマンドレットを使い、Active Directory のユーザーを参照する事ができます。
以下のコマンドは、全てのコンピューターアカウントを取得し、Windows Server 2016 の分のみを取得し結果を整形して CSV ファイルで出力しています。
一覧をコンソールに出力する
- Get-ADComputer はドメインに参加しているコンピューターアカウントを取得するコマンドレット
- 全てのコンピューターアカウントのプロパティをフィルタして取得
- -Filter を使って、取得したコンピューターアカウントを -Property を使い、属性を表示
- パイプラインを使って Format-Table で指定した属性(例えばコンピューターアカウント名や OS の名前など)をテーブルに自動で整形して出力
|
1 2 3 4 5 6 7 8 9 10 11 12 13 14 15 16 |
Get-ADComputer ` -Filter * ` -Property * | ` Format-Table ` Name, ` OperatingSystem, ` OperatingSystemServicePack, ` OperatingSystemVersion ` -Wrap –Auto # 実行結果 Name OperatingSystem OperatingSystemServicePack OperatingSystemVersion ---- --------------- -------------------------- ---------------------- DEVDC01 Windows Server 2016 Standard Evaluation 10.0 (14393) DEVDC02 Windows Server 2016 Standard Evaluation 10.0 (14393) |
上の内容を少し変えてみたいので、全てフィルタするのではなく、-Like を使って特定の名前を検索してみます。
-Like はワイルドカードを使って検索するのですが、半角のアスタリスク * を使います。
|
1 2 3 4 5 6 7 8 9 10 11 12 13 14 15 |
Get-ADComputer ` -Filter {OperatingSystem -Like *Windows Server*} ` -Property * | ` Format-Table ` Name, ` OperatingSystem, ` OperatingSystemServicePack ` -Wrap -Auto # 実行結果 Name OperatingSystem OperatingSystemVersion ---- --------------- ---------------------- DEVDC01 Windows Server 2016 Standard Evaluation 10.0 (14393) DEVDC02 Windows Server 2016 Standard Evaluation 10.0 (14393) |
今度は、-Like を使って「オペレーティングシステムのバージョンが 10 より大きい」という条件で検索してみます。
|
1 2 3 4 5 6 7 8 9 10 11 12 13 14 15 |
Get-ADComputer ` -Filter {OperatingSystemVersion -ge 10} ` -Property * | ` Format-Table ` Name, ` OperatingSystem, ` OperatingSystemVersion ` -Wrap -Auto # 実行結果 Name OperatingSystem OperatingSystemVersion ---- --------------- ---------------------- DEVDC01 Windows Server 2016 Standard Evaluation 10.0 (14393) DEVDC02 Windows Server 2016 Standard Evaluation 10.0 (14393) |
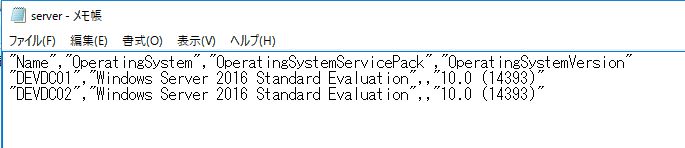
出力した内容を CSV 形式でファイルにしてエクスポートする
出力した内容が多い場合や、データとして保存・加工したい場合はファイルにエクスポートする事ができます。
Export-CSV コマンドレットは、出力したデータをコンマ区切りでエクスポートします。
NoTypeInformation は出力後のファイルを開いた時に、一番上に表示される情報になります。私は不要なので -NoTypeInformation を付けています。
Encoding UTF-8 は文字化け対策になります。
|
1 2 3 4 5 6 7 8 9 10 11 12 13 |
$file_path = "c:\temp\server.csv"; Get-ADComputer ` -Filter * ` -Property * | ` Select-Object ` Name, ` OperatingSystem, ` OperatingSystemServicePack, ` OperatingSystemVersion | ` Export-CSV ` $file_path ` -NoTypeInformation ` -Encoding UTF8 |
実行結果は以下のようになります。
Get-ADUserでユーザーアカウントを取得する
Get-ADUser コマンドレットを使い、Active Directory のユーザーを取得する事ができます。
以下のコマンドは、全てのユーザーアカウントを取得し、ユーザーがいつパスワードを変更したかを日時で取得し、またパスワードの期限が無期限かどうかを取得しています。
一覧をコンソールに出力する
パイプラインを使って Format-Table で指定した属性(上記で取得したもの)をテーブルに自動で整形して出力します。
|
1 2 3 4 5 6 7 8 9 10 11 12 13 14 15 16 17 18 19 20 21 22 23 |
Get-ADUser ` -Filter * ` -Properties ` Passwordlastset, ` Passwordneverexpires | ` Format-Table ` Name, ` Passwordlastset, ` Passwordneverexpires ` -Wrap -Auto # 実行結果 Name Passwordlastset Passwordneverexpires ---- --------------- -------------------- Administrator 2018/05/03 14:10:05 True Guest True DefaultAccount True krbtgt 2018/05/04 15:48:36 False Urashima Taro 2018/05/11 19:16:43 True User 1 2018/05/28 16:38:42 False User 2 2018/05/28 16:39:06 False User 3 2018/05/28 16:39:30 False |
また、パスワードの有効期限が切れる日 (有効期限日) を出力したい場合、-Properties で msDS-UserPasswordExpiryTimeComputed スキーマ属性を使います。
|
1 2 3 4 5 6 7 8 9 10 11 12 13 |
Get-ADuser ` user1 ` -Properties ` msDS-UserPasswordExpiryTimeComputed | ` Select ` Name, ` msDS-UserPasswordExpiryTimeComputed # 実行結果 Name msDS-UserPasswordExpiryTimeComputed ---- ----------------------------------- User 1 131755955224052433 |
パスワードの有効期限が切れる日が、日付のフォーマットではなく、長い桁の数字で返ってきました。
msDS-UserPasswordExpiryTimeComputed はタイムスタンプ属性で、返り値は 整数型のようです。
ですのでこれを日付型に変換してあげる必要があります。
以下のサイトを参考にさせて頂きました。(リンクが別ウィンドウで開きます。)
https://www.morgantechspace.com/2015/03/powershell-get-ad-users-password-expiry-date.html#export | Morgan Tech Space
|
1 2 3 4 5 6 7 8 9 10 11 12 |
Get-ADUser ` user1 ` –Properties "DisplayName", "msDS-UserPasswordExpiryTimeComputed" | ` Select-Object ` -Property "Name", ` @{Name="ExpiryDate";Expression={[datetime]::FromFileTime($_."msDS-UserPasswordExpiryTimeComputed")}} # 実行結果 Name ExpiryDate ---- ---------- User 1 2018/07/09 16:38:42 |
ちゃんと日付型で返ってきました。今度は PasswordNeverExpires のステータスが無効になっているユーザーアカウントを出力してみます。
|
1 2 3 4 5 6 7 8 9 10 11 12 13 14 |
Get-ADUser ` -Filter {Enabled -eq $True -and PasswordNeverExpires -eq $False} ` –Properties "Name","msDS-UserPasswordExpiryTimeComputed" | ` Select-Object ` -Property "Name", ` @{Name="ExpiryDate";Expression={[datetime]::FromFileTime($_."msDS-UserPasswordExpiryTimeComputed")}} # 実行結果 Displayname ExpiryDate ----------- ---------- User 1 2018/07/09 16:38:42 User 2 2018/07/09 16:39:06 User 3 2018/07/09 16:39:30 |
PasswordNeverExpires のステータスが無効になっているユーザーの一覧が取得できました。では最後に、これを CSV フォーマットでファイルに出力してみます。
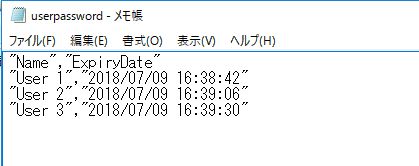
出力した内容を CSV 形式でファイルにしてエクスポートする
出力した内容が多い場合や、データとして保存・加工したい場合はファイルにエクスポートする事ができます。
Export-CSV コマンドレットは、出力したデータをコンマ区切りでエクスポートします。
NoTypeInformation は出力後のファイルを開いた時に、一番上に表示される情報になります。私は不要なので -NoTypeInformation を付けています。また、Encoding UTF-8 は文字化け対策になります。
|
1 2 3 4 5 6 7 8 9 10 11 |
$file_path = "c:\temp\userpassword.csv"; Get-ADUser ` -Filter {Enabled -eq $True -and PasswordNeverExpires -eq $False} ` –Properties "Name","msDS-UserPasswordExpiryTimeComputed" | ` Select-Object ` -Property "Name", ` @{Name="ExpiryDate";Expression={[datetime]::FromFileTime($_."msDS-UserPasswordExpiryTimeComputed")}} | ` Export-CSV ` -Path $file_path ` -NoTypeInformation ` -Encoding UTF8 |
実行結果は以下のようになります。
まとめ
以上になります。いかがでしょうか。
PowerShell でこのような事ができますと便利ですよね。上司から「パスワードの有効期限が無期限になっているユーザーがいるか確認してもらえるかな」と言われても、Active Directory ユーザーとコンピューターでアカウント毎に確認しなくても、PowerShell で迅速に対応ができます。
このような事ができればコンピューターやユーザーアカウントの棚卸しにも応用ができますよね。
では最後までお読みいただきありがとうございました!