Warning: preg_match(): Compilation failed: unrecognized character follows \ at offset 1 in /home/r5652521/public_html/soma-engineering.com/wp-content/themes/affinger/functions.php on line 1548
Warning: preg_match(): Compilation failed: unrecognized character follows \ at offset 1 in /home/r5652521/public_html/soma-engineering.com/wp-content/themes/affinger/functions.php on line 1548
Warning: preg_match(): Compilation failed: unrecognized character follows \ at offset 1 in /home/r5652521/public_html/soma-engineering.com/wp-content/themes/affinger/functions.php on line 1548
Warning: preg_match(): Compilation failed: unrecognized character follows \ at offset 1 in /home/r5652521/public_html/soma-engineering.com/wp-content/themes/affinger/functions.php on line 1548
Warning: preg_match(): Compilation failed: unrecognized character follows \ at offset 1 in /home/r5652521/public_html/soma-engineering.com/wp-content/themes/affinger/functions.php on line 1548
Warning: preg_match(): Compilation failed: unrecognized character follows \ at offset 1 in /home/r5652521/public_html/soma-engineering.com/wp-content/themes/affinger/functions.php on line 1548
Warning: preg_match(): Compilation failed: unrecognized character follows \ at offset 1 in /home/r5652521/public_html/soma-engineering.com/wp-content/themes/affinger/functions.php on line 1548
こんにちは!そーまんです。
今回は、PC のレジストリをグループポリシー (GPO) を使って管理する方法について書きました。
PC のレジストリはやり方さえわかれば、GPO を使って簡単に制御できますので、是非是非使うと管理が楽になります。
レジストリを GPO で適用するメリット
GPO を使うと、大量の PC に対してレジストリを一度に適用する事ができます。
企業の場合、PC の使用に制限が必要になってくると、例えばデスクトップにあるアクションセンター (通知領域) を非表示にしたり、コントロールパネルの中身の表示を制限させたい場合があります。
そういう場合にいくつか方法はありますが、手動で regedit でレジストリを変更すれば簡単に実現ができますが、一方で GPO を使えば大量の PC に同じレジストリを適用でき、且つ後で変更したり、元に戻したり、設定したレジストリを削除する事もできます。
ですのでこの方法を使えば PC 管理の点で非常に役に立ちます。
本記事での設定
今回はデスクトップ右下にある、「アクションセンター」を非表示にしてみます。この設定を GPO で作成して適用します。
また、この設定は会社全体の PC に適用したいので、GPO ではコンピューターのポリシーのほうで設定します。
GPO でレジストリを適用する方法
実際に GPO を作成するので事前にアクションセンターが表示されていることを確認します。

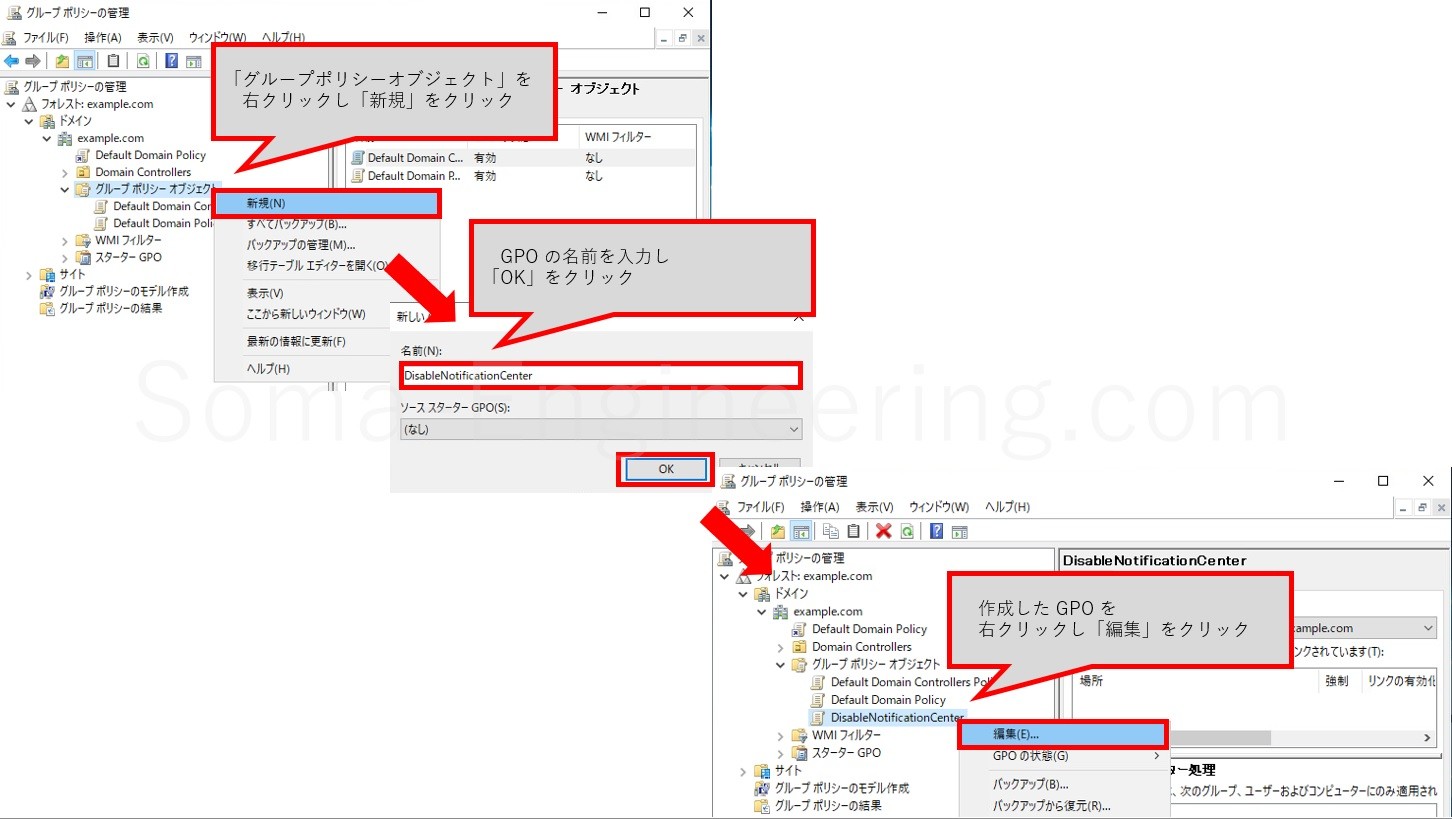
1. サーバーで「グループポリシーエディタの編集」を開き、以下の画像のように「グループポリシーオブジェクト」から GPO を作成する。
2. コンピューターの構成 - 基本設定 - Windowsの設定 – 「レジストリ」を右クリックし 「新規作成」→「レジストリ項目」をクリック

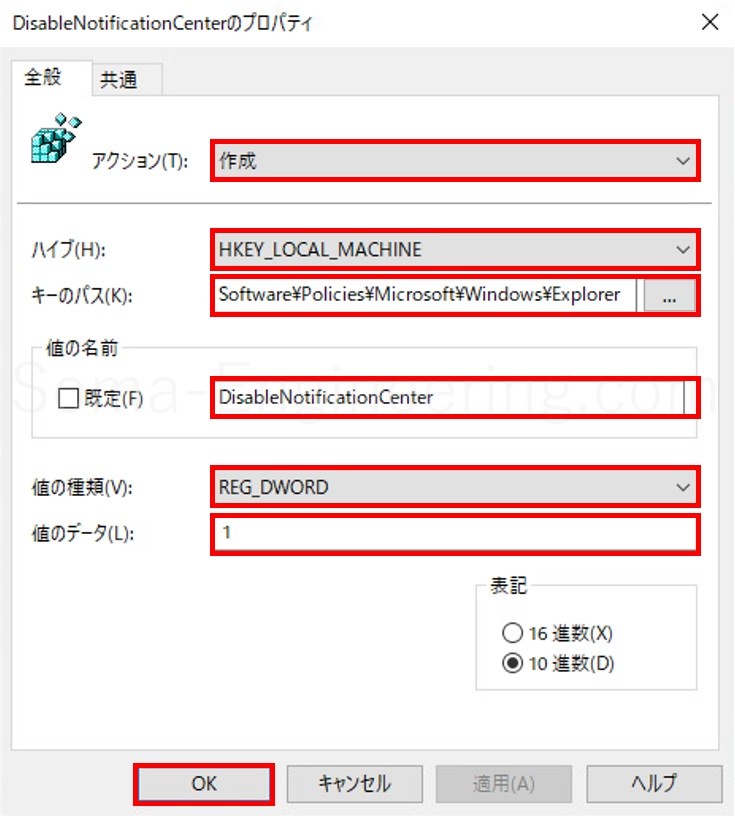
3, 以下の画像のように適用したいレジストリを設定する ※アクションは新規適用だと作成
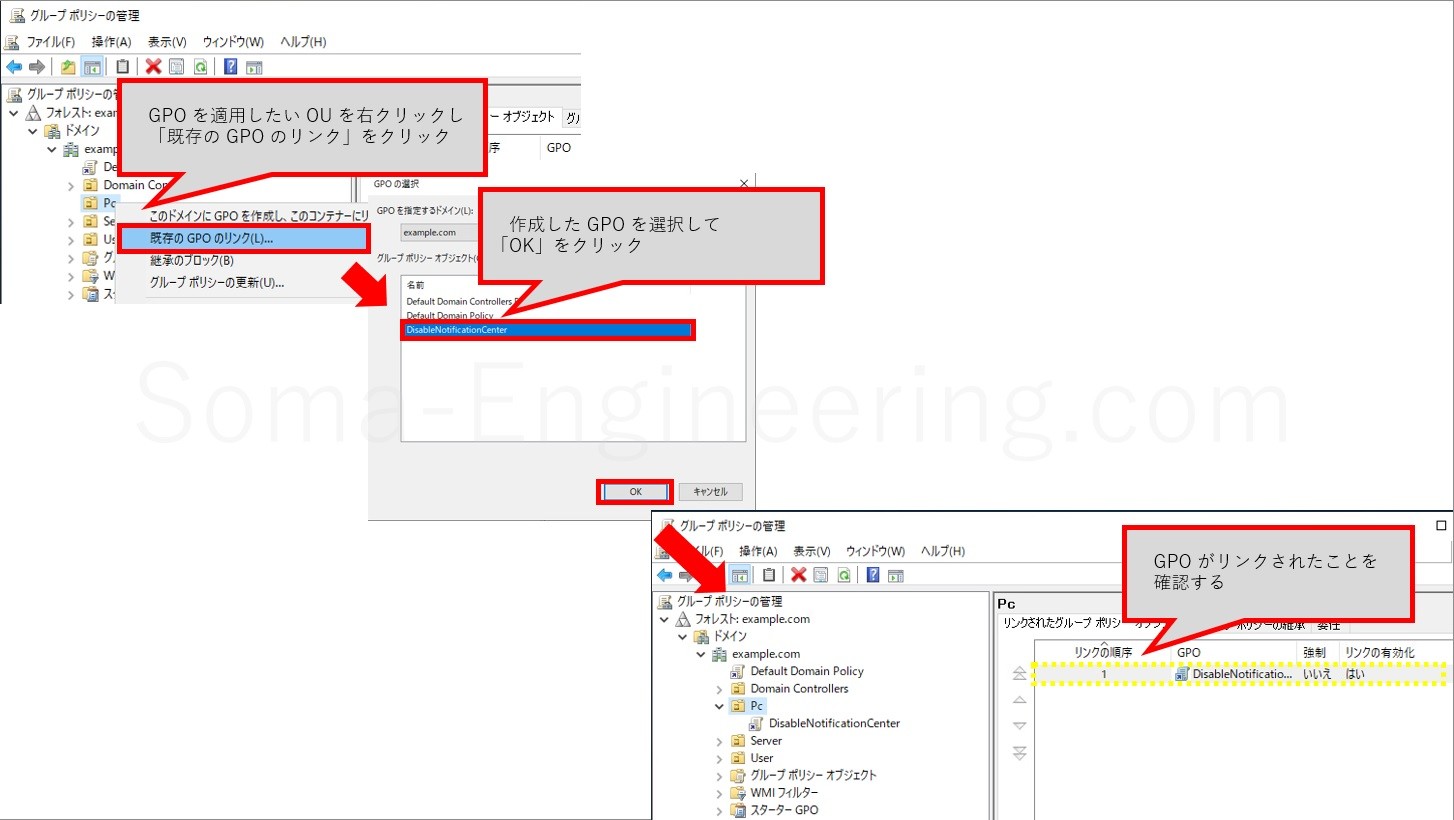
4. 作成した GPO を適用するために以下の画像のように設定します
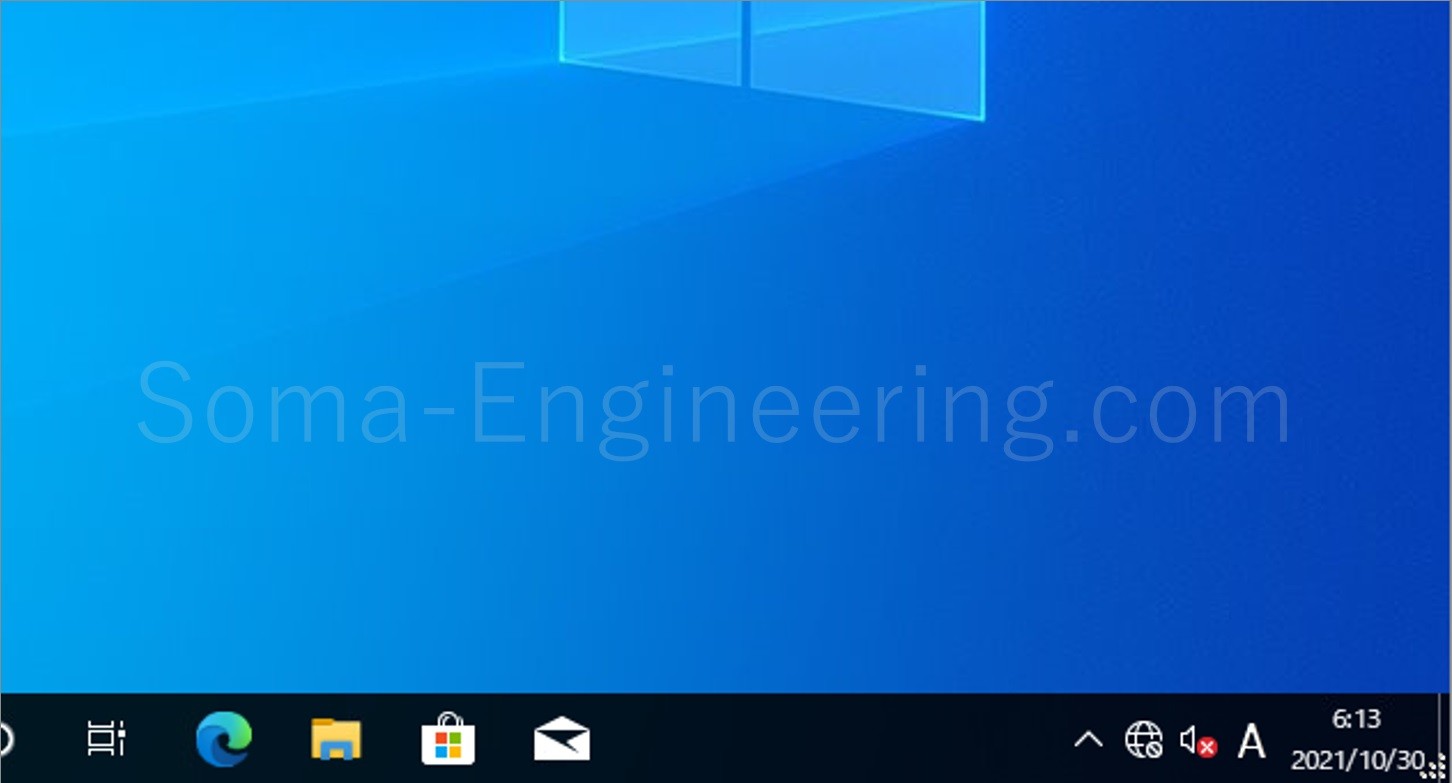
5. GPO を適用した後に、コンピューターポリシーなので PC を再起動してログオンしたところ、アクションセンターが非表示になりました
適用済みのレジストリを別のものに置き換えたい場合
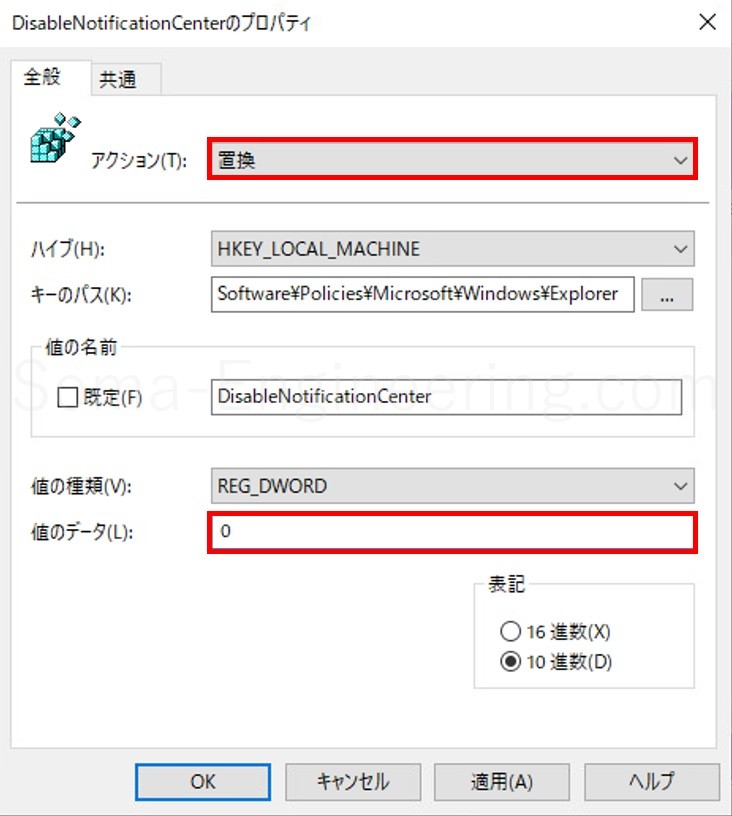
上記のように GPO を作成した後にレジストリの値を変更したい場合は、作成した GPO を編集します。
アクションの設定を「置換」に変更する。値のデータを変更したい値に変更する。「OK」をクリックする。
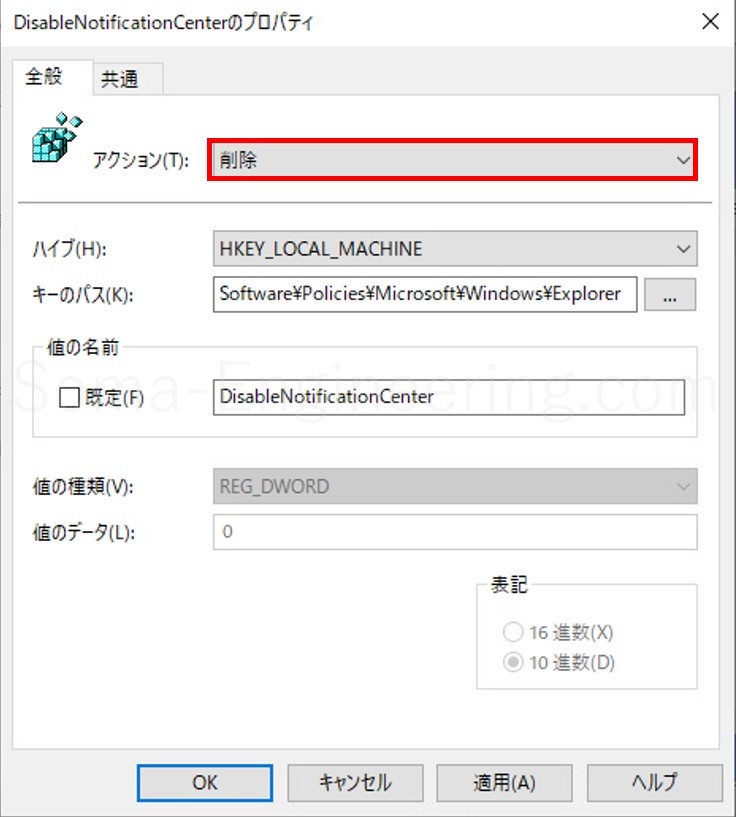
適用済みのレジストリを削除したい場合
上記のように GPO を作成・変更した後にレジストリの値を変更したい場合は、作成した GPO を編集します。
アクションの設定を「削除」に変更して「OK」をクリックする。
最後に
いかがでしょうか。
この方法でレジストリを GPO で管理すればとても楽になりますので是非ともご活用ください。
それでは最後までお読みいただき有難うございました!