Warning: preg_match(): Compilation failed: unrecognized character follows \ at offset 1 in /home/r5652521/public_html/soma-engineering.com/wp-content/themes/affinger/functions.php on line 1548
Warning: preg_match(): Compilation failed: unrecognized character follows \ at offset 1 in /home/r5652521/public_html/soma-engineering.com/wp-content/themes/affinger/functions.php on line 1548
Warning: preg_match(): Compilation failed: unrecognized character follows \ at offset 1 in /home/r5652521/public_html/soma-engineering.com/wp-content/themes/affinger/functions.php on line 1548
Warning: preg_match(): Compilation failed: unrecognized character follows \ at offset 1 in /home/r5652521/public_html/soma-engineering.com/wp-content/themes/affinger/functions.php on line 1548
こんにちは!
今回は、AWS にデプロイした CentOS に MySQL をインストールしました。
AWS に CentOS の AMI をデプロイする方法は以下の記事をご覧いただけると幸いです。
目的
最新ではない MySQL をインストールする為になります。バージョンは 5.6.26 になります。
環境
とりあえず、OS と MySQL の環境を確認します。
1. CentOS のバージョンはこちらになります。
|
1 2 |
[root@localhost ~]# cat /etc/system-release CentOS Linux release 7.4.1708 (Core) |
2. MySQL がインストールされているか確認します。インストールはされていない事を確認しました。
|
1 |
[root@localhost ~]# rpm -qa | grep mysql* |
作業手順
下準備
AWS からデプロイした CentOS の場合、最初から MySQL をインストールする事はできなかったので、事前に以下の作業を行う必要がありました。
1. wget を yum でインストールします。
|
1 |
[root@localhost ~]#yum install wget |
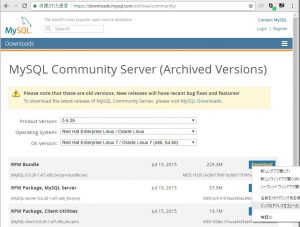
2. インストールする MySQL は最新のバージョンではないので、MySQL コミュニティから探します。
MySQL Community Server (Archived Versions) | MySQL
https://downloads.mysql.com/archives/community/
wget で tar ファイルのリンクを取得したいので以下のような方法で取得します。
3. カレントディレクトリを移動します。
|
1 |
[root@localhost ~]# cd /usr/local/src/ |
4. wget コマンドで MySQL のバンドル版のパッケージをダウンロードします。
|
1 |
[root@localhost src]# wget https://downloads.mysql.com/archives/get/file/MySQL-5.6.26-1.el7.x86_64.rpm-bundle.tar |
5. tar コマンドでダウンロードした圧縮ファイルを解凍します。
|
1 2 3 4 5 6 7 8 |
[root@localhost src]# tar xvf MySQL-5.6.26-1.el7.x86_64.rpm-bundle.tar MySQL-shared-5.6.26-1.el7.x86_64.rpm MySQL-devel-5.6.26-1.el7.x86_64.rpm MySQL-embedded-5.6.26-1.el7.x86_64.rpm MySQL-test-5.6.26-1.el7.x86_64.rpm MySQL-server-5.6.26-1.el7.x86_64.rpm MySQL-shared-compat-5.6.26-1.el7.x86_64.rpm MySQL-client-5.6.26-1.el7.x86_64.rpm |
6. perl と perl-devel を yum でインストールします。
|
1 |
[root@localhost src]# yum install perl perl-devel |
7. libaio と libaio-devel を yum でインストールします。
libaio は、Linux カーネルプロジェクトの一部として開発されたライブラリーで、MySQL には必須なライブラリのようです。
|
1 |
[root@localhost src]# yum install libaio libaio-devel |
インストールされていないと MySQL サーバーのインストールに失敗してしまいます。
|
1 2 3 4 5 |
warning: MySQL-server-5.6.26-1.el7.x86_64.rpm: Header V3 DSA/SHA1 Signature, key ID 5072e1f5: NOKEY error: Failed dependencies: libaio.so.1()(64bit) is needed by MySQL-server-5.6.26-1.el7.x86_64 libaio.so.1(LIBAIO_0.1)(64bit) is needed by MySQL-server-5.6.26-1.el7.x86_64 libaio.so.1(LIBAIO_0.4)(64bit) is needed by MySQL-server-5.6.26-1.el7.x86_64 |
8. デプロイした CentOS には mariadb のライブラリが入っており、インストールする MySQL-shared と競合してしまうので、アンインストールします。
|
1 2 |
[root@localhost src]# rpm -qa | grep mariadb mariadb-libs-5.5.56-2.el7.x86_64 |
ただしアンインストールしようとすると、libmysqlclient.so.18 が依存しており、失敗しまいます。
|
1 2 3 4 |
[root@localhost src]# rpm -e mariadb-libs-5.5.56-2.el7.x86_64 error: Failed dependencies: libmysqlclient.so.18()(64bit) is needed by (installed) postfix-2:2.10.1-6.el7.x86_64 libmysqlclient.so.18(libmysqlclient_18)(64bit) is needed by (installed) postfix-2:2.10.1-6.el7.x86_64 |
そこで、libmysqlclient.so.18 をアンインストールする為に、 postfix をアンインストールします。
|
1 |
[root@localhost src]# rpm -e postfix |
もう一度、mariadb のライブラリをアンインストールしてみたところ、成功しました。
|
1 |
[root@localhost src]# rpm -e mariadb-libs-5.5.56-2.el7.x86_64 |
9. MySQL のインストール前に、Data::DumperというPerlのデバッグ用モジュールが必要になりますので、perl-Data-Dumperをインストールします。
|
1 |
[root@localhost src]# yum install perl-Data-Dumper |
また、Data::Dumper をインストールしないと、MySQL のインストールに失敗します。Data::Dumper は必須のようです。
|
1 2 3 4 5 6 7 8 9 |
[root@localhost src]# rpm -Uvh MySQL-server-5.6.26-1.el7.x86_64.rpm warning: MySQL-server-5.6.26-1.el7.x86_64.rpm: Header V3 DSA/SHA1 Signature, key ID 5072e1f5: NOKEY Preparing... ################################# [100%] Updating / installing... 1:MySQL-server-5.6.26-1.el7 ################################# [100%] warning: user mysql does not exist - using root warning: group mysql does not exist - using root FATAL ERROR: please install the following Perl modules before executing /usr/bin/mysql_install_db: Data::Dumper |
MySQL のインストール
1. MySQL-serverをインストールします。MySQL の root パスワード自動的に発行されますので、後で確認できます。
|
1 2 3 4 5 6 7 8 9 10 11 12 13 14 15 16 17 18 19 20 21 22 23 |
[root@localhost src]# rpm -Uvh MySQL-server-5.6.26-1.el7.x86_64.rpm warning: MySQL-server-5.6.26-1.el7.x86_64.rpm: Header V3 DSA/SHA1 Signature, key ID 5072e1f5: NOKEY Preparing... ################################# [100%] Updating / installing... 1:MySQL-server-5.6.26-1.el7 ################################# [100%] warning: user mysql does not exist - using root warning: group mysql does not exist - using root ... A RANDOM PASSWORD HAS BEEN SET FOR THE MySQL root USER ! You will find that password in '/root/.mysql_secret'. You must change that password on your first connect, no other statement but 'SET PASSWORD' will be accepted. See the manual for the semantics of the 'password expired' flag. Also, the account for the anonymous user has been removed. In addition, you can run: /usr/bin/mysql_secure_installation ... New default config file was created as /usr/my.cnf and will be used by default by the server when you start it. You may edit this file to change server settings |
2. MySQL-client をインストールします。
|
1 |
[root@localhost src]# rpm -Uvh MySQL-client-5.6.26-1.el7.x86_64.rpm |
3. MySQL-shared をインストールします。
|
1 |
[root@localhost src]# rpm -Uvh MySQL-shared-5.6.26-1.el7.x86_64.rpm |
4. MySQL-shared-compat をインストールします。
|
1 |
[root@localhost src]# rpm -Uvh MySQL-shared-compat-5.6.26-1.el7.x86_64.rpm |
5. MySQL に必要なものは最小限インストールしましたので、バージョンを確認します。
|
1 2 |
[root@localhost src]# mysql --version mysql Ver 14.14 Distrib 5.6.26, for Linux (x86_64) using EditLine wrapper |
MySQL サービスの起動と正常性確認
1. MySQL サービスを systemctl コマンドで起動します。
|
1 |
[root@localhost src]# systemctl start mysql.service |
2. サービスが正常に起動したかどうか、状態を確認します。正常に起動できました。
|
1 2 3 4 |
[root@localhost src]# systemctl status mysql.service mysql.service - LSB: start and stop MySQL ... May 06 02:29:11 ip-172-31-24-219.ap-northeast-1.compute.internal mysql[19003]: Starting MySQL. SUCCESS! |
MySQL の root パスワードの確認
MySQL のパスワードは自動で発行されますので、パスワードを確認します。
|
1 2 |
[root@localhost src]# cat /root/.mysql_secret # The random password set for the root user at Sun May 6 02:18:25 2018 (local time): pMgpYR52G9a4f_6o |
MySQL に接続
確認したパスワードで MySQL に接続します。
|
1 2 3 4 5 6 7 8 9 10 11 12 13 14 |
[root@localhost src]# mysql -u root -p Enter password: Welcome to the MySQL monitor. Commands end with ; or \g. Your MySQL connection id is 5 Server version: 5.6.26 Copyright (c) 2000, 2015, Oracle and/or its affiliates. All rights reserved. Oracle is a registered trademark of Oracle Corporation and/or its affiliates. Other names may be trademarks of their respective owners. Type 'help;' or '\h' for help. Type '\c' to clear the current input statement. mysql> |
以上になります。
いかがでしょうか。
MySQL のインストールはとりあえず完了しましたが、MySQL の設定など、他にも作業するところがまだあります。
とはいえ、まずはインストールできましたので、指定の MySQL 5 のバージョンをインストールする時にも使いまわせそうです。
では最後までお読みいただきありがとうございました!


