Warning: preg_match(): Compilation failed: unrecognized character follows \ at offset 1 in /home/r5652521/public_html/soma-engineering.com/wp-content/themes/affinger/functions.php on line 1548
Warning: preg_match(): Compilation failed: unrecognized character follows \ at offset 1 in /home/r5652521/public_html/soma-engineering.com/wp-content/themes/affinger/functions.php on line 1548
Warning: preg_match(): Compilation failed: unrecognized character follows \ at offset 1 in /home/r5652521/public_html/soma-engineering.com/wp-content/themes/affinger/functions.php on line 1548
Warning: preg_match(): Compilation failed: unrecognized character follows \ at offset 1 in /home/r5652521/public_html/soma-engineering.com/wp-content/themes/affinger/functions.php on line 1548
Warning: preg_match(): Compilation failed: unrecognized character follows \ at offset 1 in /home/r5652521/public_html/soma-engineering.com/wp-content/themes/affinger/functions.php on line 1548
Warning: preg_match(): Compilation failed: unrecognized character follows \ at offset 1 in /home/r5652521/public_html/soma-engineering.com/wp-content/themes/affinger/functions.php on line 1548
こんにちは!SE ブログの相馬です。
今回は、Azure 用の PowerShell があるという事を知り調べてみました。
Azure には 2 種類の PowerShell があり概要について纏めてみました。
また、Azure Cloud Shell と Azure PowerShell のインストール方法や使い方について書いてみましたので、参考になれば幸いです。
Azure PowerShell とは何か
Microsoft のサイトに分かり易い内容が書いてありましたので引用させていただきました。
Azure PowerShell は、コマンド ラインから Azure リソースを管理したり、Azure Resource Manager を操作対象とする自動化スクリプトを作成したりできるように設計されています。
引用元:Azure PowerShell を使ってみる | Microsoft Azure
端末からリモートで Azure に接続して、リソースをデプロイ・管理する事ができるという内容で、端末から使用するには Azure PowerShell をインストールする必要があります。
Azure PowerShell の種類
上にも書きましたが、Azure 用の PowerShell は 2 種類あります。
- Azure ポータルから実行できるのが、Azure Cloud Shell になります。
- Windows 環境から実行できるのが、Azure PowerShell になります。
マイクロソフトのドキュメントがありますので、詳細はこちらを参照していただくと良いでしょう。
Azure PowerShell を使ってみる
https://docs.microsoft.com/ja-jp/powershell/azure/get-started-azureps?view=azurermps-5.7.0
先に Azure Cloud Shell から説明します。
Azure Cloud Shell
上記のように Azure ポータルから実行でき、インストール不要で簡単な方法です。使用方法は以下のとおりです。但し、料金がかかるところに注意が必要です。
使用方法
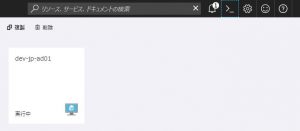
1. Azure ポータルウィンドウ右上に >_ が表示されているので、それをクリックします。
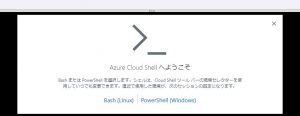
2. Azure ポータルウィンドウ下に、以下の表示がでますので、PowerShell (Windows) をクリックします。
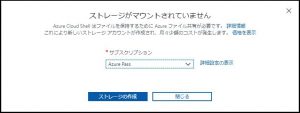
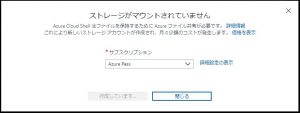
3. 使用するにはサブスクリプションが必要になります。使うサブスクリプションを選択して [ストレージの作成] をクリックします。
なお、料金についてはマイクロソフトに説明があります。
Cloud Shell の価格 | Microsoft Azure
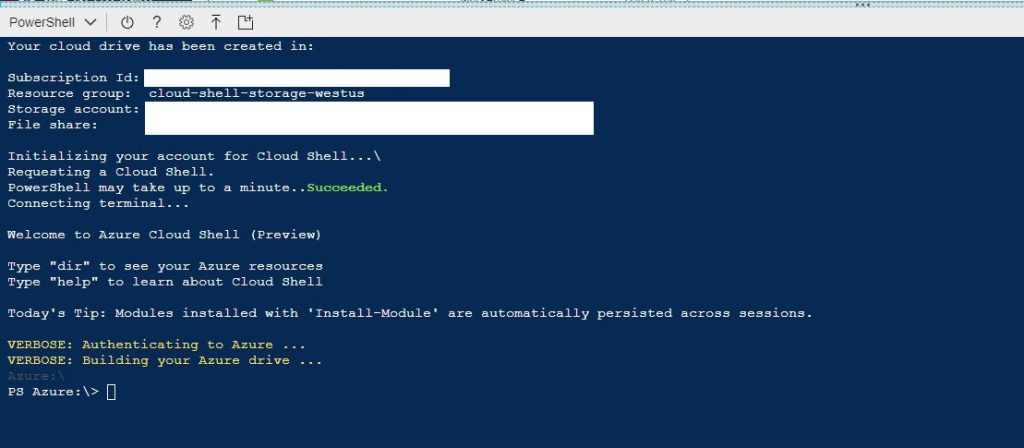
4. ストレージの作成が完了しますと、PowerShell が表示されます。これで使用できるようになりました。
Azure Power Shell
Windows 環境に インストールして使う方法になります。Windows 環境と書いてありますが、MacOS や Linux でもインストールして使えるようです。
- Installing PowerShell Core on Linux | Microsoft
- How to install Microsoft PowerShell 6.0 on macOS | TechRepublic
インストール方法
注意:PowerShell を管理者として起動します。
1. まずは、PowerShellGet のバージョンを確認します。
確認する方法として、Get-Module コマンドレットを使い、PowerShell のモジュールのバージョンをコンソールに出力します。
また、パイプラインを使って PowerShellGet の Name、Version や Path をリストで出力します。
実行結果で返ってきたバージョンが 1.1.2.0 より下のバージョンであれば、新しいバージョンをインストールします。
- PowerShell 1.1.2.0 か、それより上のバージョン:インストールは必要ありません。
- PowerShell 1.1.2.0 より下のバージョン:インストールする必要があります。
バージョン確認方法は以下になります。
|
1 2 3 4 5 6 7 8 |
Get-Module -Name PowerShellGet -ListAvailable | Select-Object -Property Name,Version,Path # 実行結果 Name Version Path ---- ------- ---- PowerShellGet 1.0.0.1 C:\Program Files\WindowsPowerShell\Modules\PowerShellGet\1.0.0.1\PowerShellGet.psd1 |
2. 実行結果、PowerShellGet バージョン が 10.0.0.1 ですので更新が必要です。
※上での確認結果、バージョンが PowerShell 1.1.2.0 以上であれば 4 から見てください。
新しい PowerShellGet をインストールするには、Install-Module コマンドレットを使用します。
|
1 2 3 4 5 |
Install-Module PowerShellGet -Force # 実行結果 インストールのプログレスバーが表示され、完了後に消えます。 |
3. 新しいバージョンの PowerShellGet がインストールされたか確認します。
|
1 2 3 4 5 6 7 8 |
Get-Module -Name PowerShellGet -ListAvailable | Select-Object -Property Name,Version,Path # 実行結果 Name Version Path ---- ------- ---- PowerShellGet 1.6.0 C:\Program Files\WindowsPowerShell\Modules\PowerShellGet\1.6.0\PowerShellGet.psd1 PowerShellGet 1.0.0.1 C:\Program Files\WindowsPowerShell\Modules\PowerShellGet\1.0.0.1\PowerShellGet.psd1 |
4. Azure PowerShellGet をインストールした後に、PowerShell の実行ポリシーを確認します。
PowerShell の実行ポリシーについての記事はこちらになります。
https://soma-engineering.com/coding/powershell/change-executinpolicy-powershell/2018/04/27/
Azure PowerShell でコマンドレットを実行するには、実行ポリシーが RemoteSigned かまたはそれより低いレベルのポリシーになっている必要があります。
ここでは、セキュリティーの事を考慮し RemoteSigned に変更します。
実行ポリシーのレベルを確認するには、Get-ExecutionPolicy コマンドレットを使います。
|
1 2 3 4 5 |
Get-ExecutionPolicy # 実行結果 RemoteSigned |
上の実行結果が、Restricted になっている場合は実行ポリシーを RemoteSigned より低いレベルに変更します。(RemoteSignedをおすすめします。)
実行ポリシーのレベルを変更するには、Set-ExecutionPolicy コマンドレットを使います。
|
1 2 3 4 5 6 |
Set-ExecutionPolicy -ExecutionPolicy RemoteSigned # 実行結果 実行する為の確認がコンソールに出力しましたら、Yes (y) を入力して Enter キーを押します。 |
5. AzureRM モジュールをインストールします。
既定では、PowerShell ギャラリーは PowerShellGet の信頼できるリポジトリとして構成されていません。
PSGallery の初回使用時には、次のプロンプトが表示されますので、Y を入力して Enter キーを押します。
AzureRM モジュールをインストールするには、Install-Module コマンドレットを使います。
|
1 |
Install-Module -Name AzureRM -AllowClobber |
6. AzureRM モジュールのバージョンを確認します。
バージョンを確認するには、Get-Module コマンドレットを使い、AzureRM モジュールのバージョンをコンソールに出力します。
また、パイプラインを使って PowerShellGet の Name、Version や Path をリストで出力します。
|
1 2 3 4 5 6 7 8 |
Get-Module -Name AzureRM -ListAvailable | Select-Object -Property Name, Version, Path # 実行結果 Name Version Path ---- ------- ---- AzureRM 5.7.0 C:\Program Files\WindowsPowerShell\Modules\AzureRM\5.7.0\AzureRM.psd1 |
7. AzureRM モジュールを読み込んで PowerShell セッションに読み込みます。
※これは通常の (管理者特権ではないユーザー) PowerShell セッションで実行する必要があります。
PowerShell を管理者として起動しないで、ユーザーで起動します。
Import-Module コマンドレットを使い、-Name スイッチで AzureRM を指定し、アクティブセッションにモジュールをインポートします。
インポート完了後に、モジュールによる管理タスクが実行できるようになります。
|
1 2 3 4 5 6 |
Import-Module -Name AzureRM # 実行結果 何も結果が出力されていなければ完了とみなすようです。 |
まとめ
以上になります。いかがでしょうか。
Azure ポータルから Azure Cloud Shell を使うのも良いですが、Azure PowerShell は Windows 環境、例えば 管理 PC から実行できるので便利ですね。
Azure Cloud Shell で使える機能と、Azure PowerShell で使える機能に差異があるかどうかは、未だしらべていないのでわかりませんと言った状況です。
Azure PowerShell のほうは、個人的にですが、画面コピーも取りやすいですし、操作の点を考えますと何かと Azure PowerShell は使いやすいのではないかと思いました。
では最後までお読みいただきありがとうございました!
