Warning: preg_match(): Compilation failed: unrecognized character follows \ at offset 1 in /home/r5652521/public_html/soma-engineering.com/wp-content/themes/affinger/functions.php on line 1548
Warning: preg_match(): Compilation failed: unrecognized character follows \ at offset 1 in /home/r5652521/public_html/soma-engineering.com/wp-content/themes/affinger/functions.php on line 1548
Warning: preg_match(): Compilation failed: unrecognized character follows \ at offset 1 in /home/r5652521/public_html/soma-engineering.com/wp-content/themes/affinger/functions.php on line 1548
Warning: preg_match(): Compilation failed: unrecognized character follows \ at offset 1 in /home/r5652521/public_html/soma-engineering.com/wp-content/themes/affinger/functions.php on line 1548
Warning: preg_match(): Compilation failed: unrecognized character follows \ at offset 1 in /home/r5652521/public_html/soma-engineering.com/wp-content/themes/affinger/functions.php on line 1548
Warning: preg_match(): Compilation failed: unrecognized character follows \ at offset 1 in /home/r5652521/public_html/soma-engineering.com/wp-content/themes/affinger/functions.php on line 1548
Warning: preg_match(): Compilation failed: unrecognized character follows \ at offset 1 in /home/r5652521/public_html/soma-engineering.com/wp-content/themes/affinger/functions.php on line 1548
Warning: preg_match(): Compilation failed: unrecognized character follows \ at offset 1 in /home/r5652521/public_html/soma-engineering.com/wp-content/themes/affinger/functions.php on line 1548
こんにちは!
AzureVM(仮想マシン)に PowerShell でディスクを作成・追加してみました。
この記事を通してディスクの作成を試していただくと、仮想マシンに対してディスクを作成し、追加する一連の流れが理解できるかと思います。
まずは Azure で使用されるディスクの種類から確認してゆきたいと思います。
ディスクとは
ここでいうディスクとは、仮想マシンに追加するデータ用のディスクになります。
最大で 4 TB(2018年6月時点)が上限になります。
Azure IaaS VM: 最大 4 TB の大容量ディスクを発表 | Microsoft TechNet
ディスクの種類
まず、自分の中で整理できていないので、Disk の種類を整理しますと、Disk は 2 種類あります。Standard と Premium になります。
一言でいえば、Standard は HDD ベース なので遅い、Premium は SSD ベース なので早いといった感じになります。
ここでは、テスト用として HDD を作成します。
| 種類 | 性能 | 用途 |
|---|---|---|
| Standard | HDDベース
基本的に低パフォーマンス (IO) |
一般的な役割のサーバーでの用途になります。
ファイル共有など、それほど Disk のパフォーマンスが要求されないようなサーバーに使用します。 |
| Premium | SSDベース
高パフォーマンス (IO) |
特定の役割のサーバーでの用途になります。
DB サーバーなど、高い Disk のパフォーマンスが要求されるようなサーバーに使用します。 |
事前準備
- Azure PowerShell で Azure Portal に接続済みである事。
方法は以下の記事を参考にしていただければ幸いです。(別タブで開きます)
【Azure】Azure PowerShellでAzureに接続する
Disk を作成・追加する流れ
PowerShell で Azure の Disk を作成・追加するには、以下のような順序があります。(と思っております)
- Disk の構成オブジェクトを作成
- Disk を作成(構成オブジェクトをもとに)
- 仮想マシンに Disk を追加する
- 仮想マシンの構成を更新する
- 仮想マシン上でディスクを初期化する
Disk の構成オブジェクトを作成する
New-AzureRmDiskConfig コマンドレットを使用し、ディスクの構成オブジェクトを作ります。
New-Azure
|
1 2 3 4 5 6 7 8 9 |
$DiskConfig = New-AzureRmDiskConfig ` -Location "EastUS" ` -CreateOption Empty ` -DiskSizeGB 32 # 実行結果(以下の警告以外が表示されなければ良しとします。) 警告: New-AzureRmDiskConfig: A property of the output of this cmdlet will change in an upcoming breaking change release. The Name property for a Sku will return Standard_LRS and Premium _LRS |
Disk を作成する
New-Azure
New-AzureRmDisk コマンドレットを使用し、Disk を作ります。
New-Azure
|
1 2 3 4 5 6 7 8 9 |
$Disk = New-AzureRmDisk ` -ResourceGroupName "TestLab" ` -DiskName "Data" ` -Disk $DiskConfig # 実行結果(完了までに少し時間がかかるかと思います。また、以下の警告以外が表示されなければ良しとします。) 警告: New-AzureRmDisk: A property of the output of this cmdlet will change in an upcoming breaking change release. The Name property for a Sku will return Standard_LRS and Premium_LRS |
作成した Disk の情報を取得する場合は、以下のコマンドで確認できます。
|
1 2 3 4 5 6 7 8 9 10 11 12 13 14 15 16 17 18 19 20 21 22 |
Get-AzureRmDisk -ResourceGroupName "TestLab" -DiskName "Data" # 実行結果 警告: Get-AzureRmDisk: A property of the output of this cmdlet will change in an upcoming breaking change release. The Name property for a Sku will return Standard_LRS and Premium_LRS ResourceGroupName : TestLab ManagedBy : Sku : Microsoft.Azure.Management.Compute.Models.DiskSku Zones : TimeCreated : 2018/06/04 3:44:26 OsType : CreationData : Microsoft.Azure.Management.Compute.Models.CreationData DiskSizeGB : 32 EncryptionSettings : ProvisioningState : Succeeded Id : /subscriptions/.../resourceGroups/TestLab/providers/Microsoft.Compute/disks/Data Name : Data Type : Microsoft.Compute/disks Location : eastus Tags : {} |
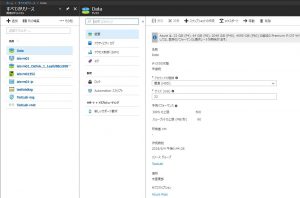
すべてのリソースに、追加した Disk がありました。確認しましたところ、構成したとおりの内容で作成されています。
仮想マシンに Disk を追加する
ここでは仮想マシンの構成内容を変数に代入し、その変数を指定して Disk を追加する方法とします。
Get-AzureRmVm コマンドレットを使用し、仮想マシンの構成内容を変数 $vm に代入します。
Get-Azure
|
1 2 3 4 5 6 |
$vm = Get-AzureRmVm -ResourceGroupName "TestLab" -Name "labvm01" # 実行結果(以下の警告以外が表示されなければ良しとします。) 警告: Get-AzureRmVM: A property of the output of this cmdlet will change in an upcoming breaking change release. The StorageAccountType property for a DataDisk will return Standard_LRS and Premium_LRS |
Add-AzureRmVmDataDisk コマンドレットを使用し、指定した仮想マシンに Disk を追加します。
Add-AzureRmVmDataDisk | Microsoft Azure
|
1 2 3 4 5 6 7 8 9 10 11 |
$vm = Add-AzureRmVmDataDisk ` -VM $vm ` -Name "Data" ` -CreateOption Attach ` -ManagedDiskId $Disk.Id ` -Lun 1 # 実行結果 何も表示されなければ良しとします。 |
仮想マシンの構成を更新する
Update-AzureRmVm コマンドレットを使用し、仮想マシンの構成を更新します。
Update-AzureRmVm | Microsoft Azure
|
1 2 3 4 5 6 7 8 |
Update-AzureRmVm -ResourceGroupName "TestLab" -VM $vm # 実行結果 RequestId IsSuccessStatusCode StatusCode ReasonPhrase --------- ------------------- ---------- ------------ True OK OK |
仮想マシン上でディスクを初期化する
RDP でサーバーに接続し、PowerShell を実行します。
また、以下の流れの処理で実行します。
- Get-Disk コマンドレットで、raw フォーマットのパーティションを取得します。
- Initialize-Disk コマンドレットで、取得したパーティションを MBR でフォーマットします。
- New-Partition コマンドレットで、ドライブレターの割り当てとサイズを全て割り当てます。
- Format-Volume コマンドレットで、NTFS ファイルシステムに設定、ラベルを Data、実行確認を $false(無効)にします。
Get-Disk コマンドレット | Microsoft Azure
Initialize-Disk コマンドレット | Microsoft Azure
New-Partition コマンドレット | Microsoft Azure
Format-Volume コマンドレット | Microsoft Azure
|
1 2 3 4 5 6 7 8 9 10 11 |
Get-Disk | Where PartitionStyle -eq 'raw' | ` Initialize-Disk -PartitionStyle MBR -PassThru | ` New-Partition -AssignDriveLetter -UseMaximumSize | ` Format-Volume -FileSystem NTFS -NewFileSystemLabel "Data" -Confirm:$false # 実行結果 DriveLetter FileSystemLabel FileSystem DriveType HealthStatus OperationalStatus SizeRemaining Size ----------- --------------- ---------- --------- ------------ ----------------- ------------- ---- F Data NTFS Fixed Healthy OK 31.92 GB 32 GB |
ディスクが追加されているか確認する
今までの流れでの結果、ディスクが追加されているか、確認します。
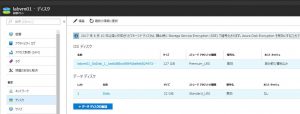
1. Azure ポータルにサインインします。追加した仮想マシンのディスクが表示されている事を確認します。
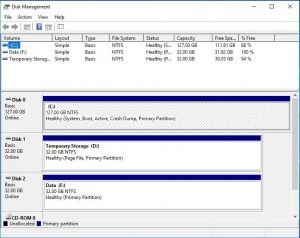
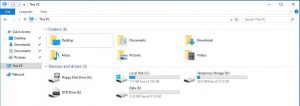
2. OS 側で追加されているディスクが初期化・構成されている事を確認します。
以上になります。
いかがでしょうか。これで AzureVM に対してディスクを追加する基本が理解できました。
Azure コマンドレットの説明が未だ日本語化されていないのがあるので対応してほしいです。
とはいえ、ディスクの作成・管理で Microsoft のサイトで分かり易い説明がありましたので貼り付けておきます。
Azure Virtual Machines の作成および管理に使用される一般的な PowerShell コマンド | Microsoft Azure
では最後までお読みいただきありがとうございました!
おすすめの本はこちら ↓↓↓
